Crypto is certainly not my specialty but this is an ‘automotive ctf’, and working in the industry it became a pride point for me to solve this.
You’re provided a binary that reads 16 bytes of input and encrypts it with a hardcoded key. It doesn’t take a lot of looking at it to recognize that it’s (probably) AES. You can, for example, provide shorter input and see that the output is 16 bytes regardless, or change only one byte and see that the entire output changes, to prove that it’s a block cipher.
There’s some simple control flow flattening that slows down reverse engineering a little bit, but the real wrench is that the key is somehow embedded into the algorithm.
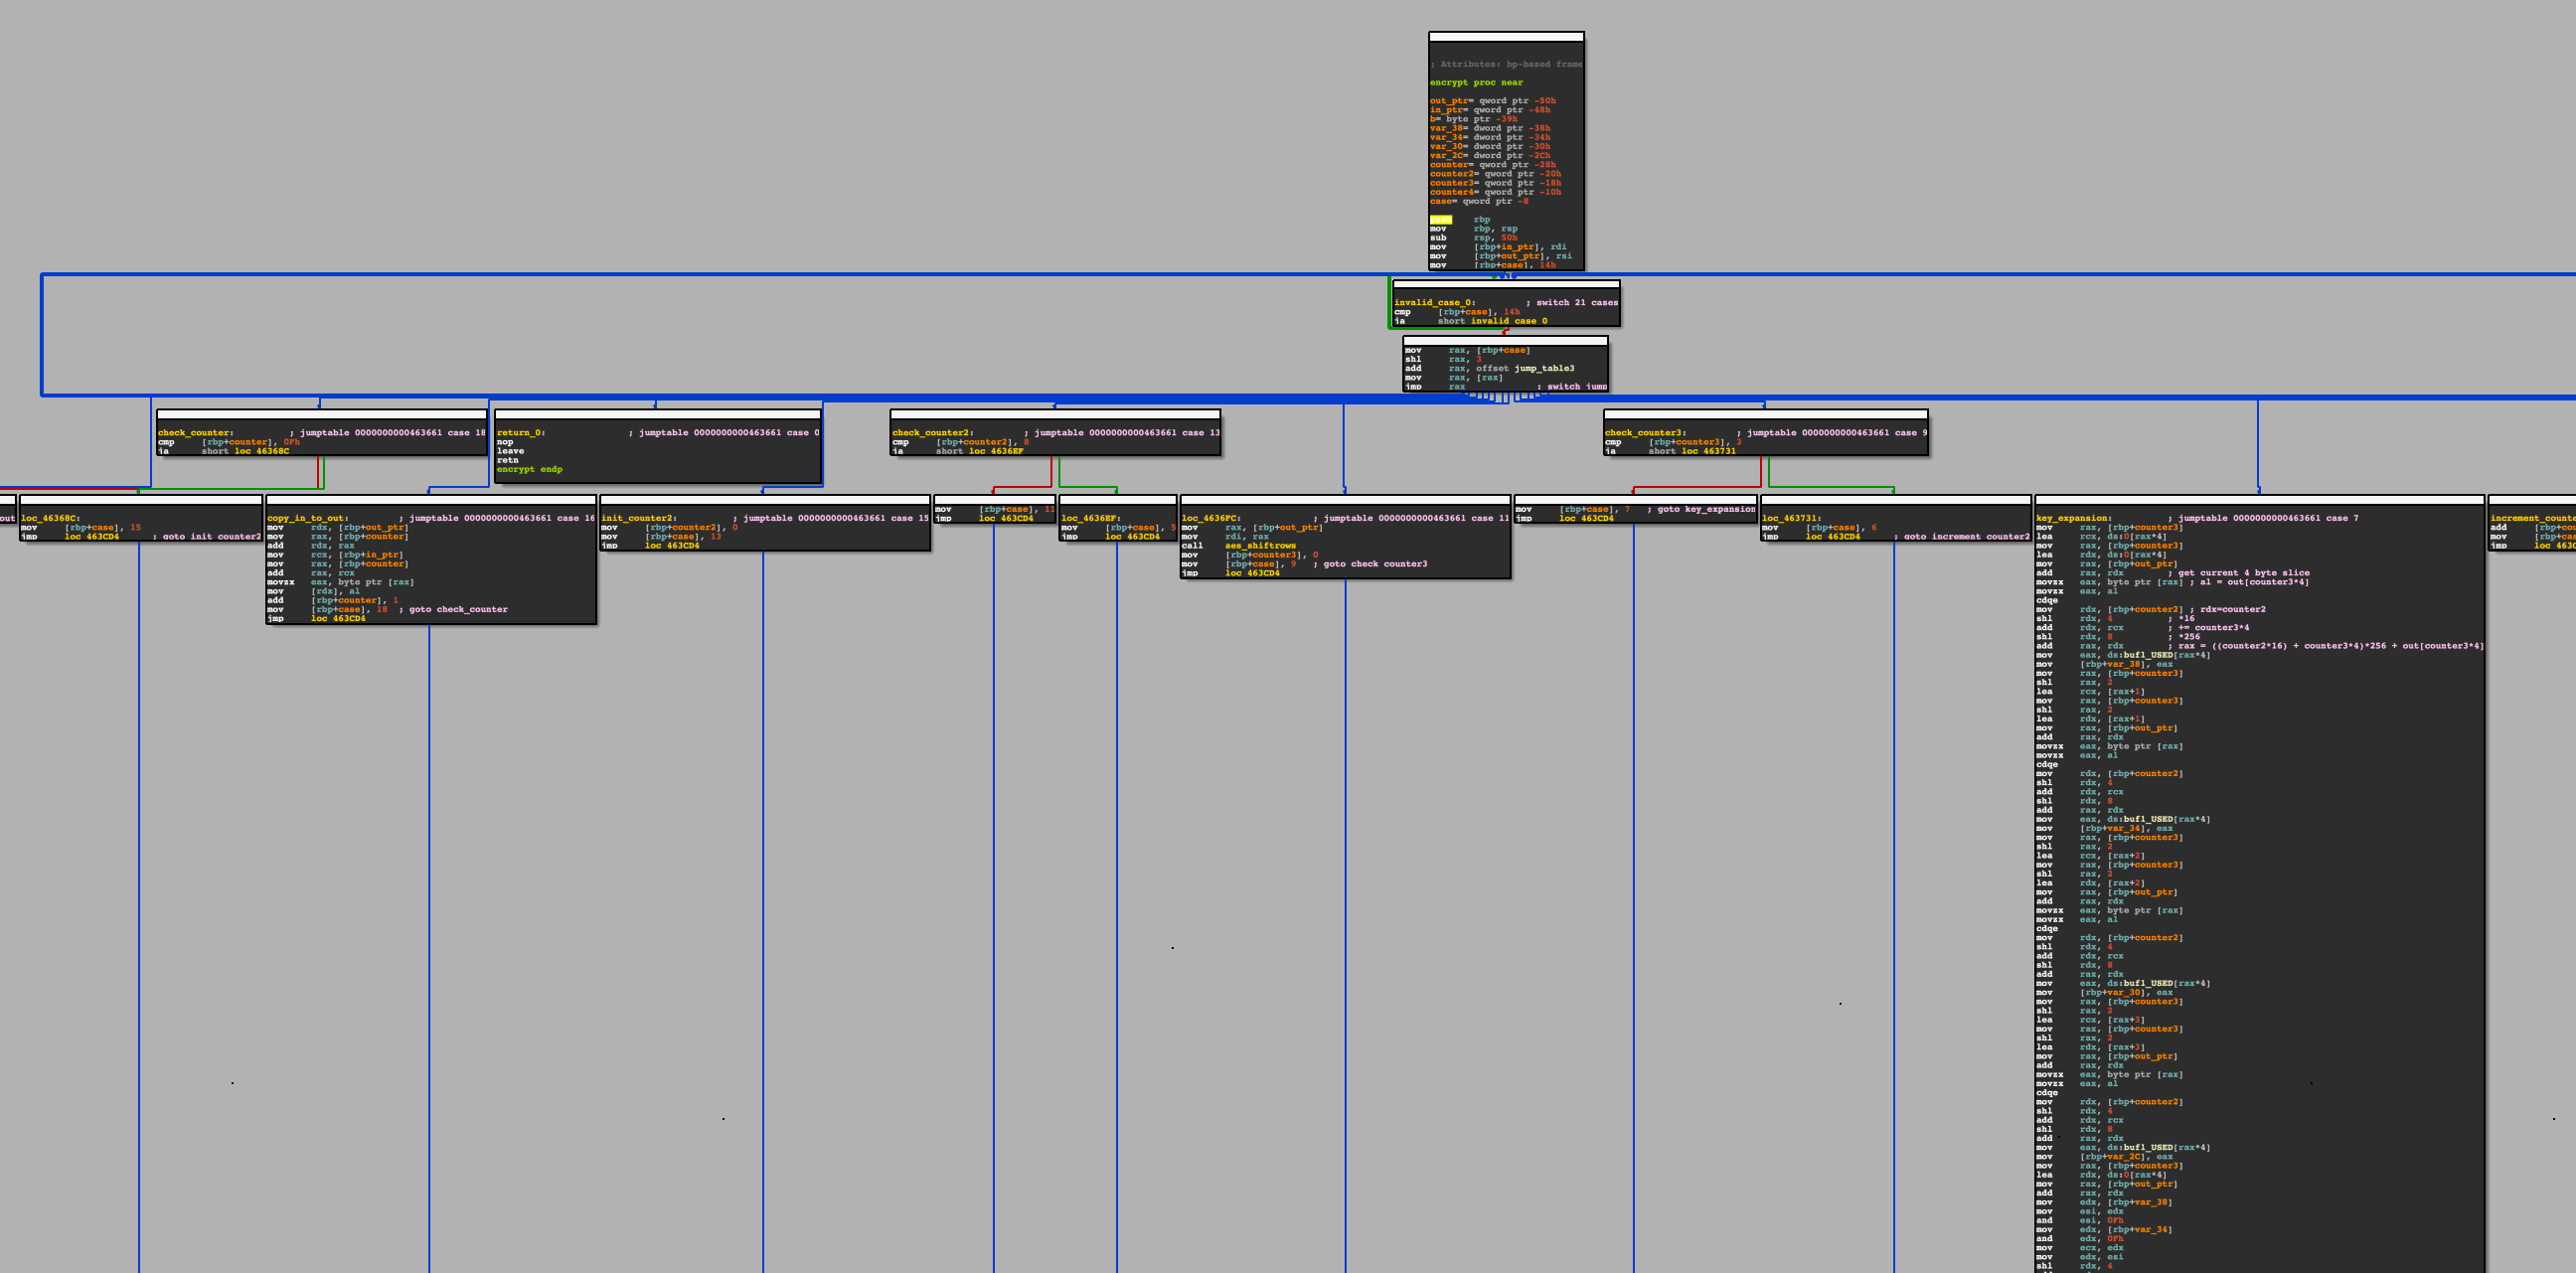
The way I get around the CFF is I simply set a break on the switch case dispatch dispatch and follow the first jump, and then at the end of each ‘case’ I label the next case based on the value set in the flow flag. My buddy uafio has a great video explaining how to figure out the more intense clang CFF, so I suggest you take a look here.
Once I had a basic idea for how it worked I was able to confirm the algorithm as AES by identifying certain steps outlined in the algorithm, for example seeing ten rounds of the shiftrows steps (which also confirms the keysize is 128 bits). Still, the SubBytes table was not the normal one, and the other steps were hard to map to parts of the code.
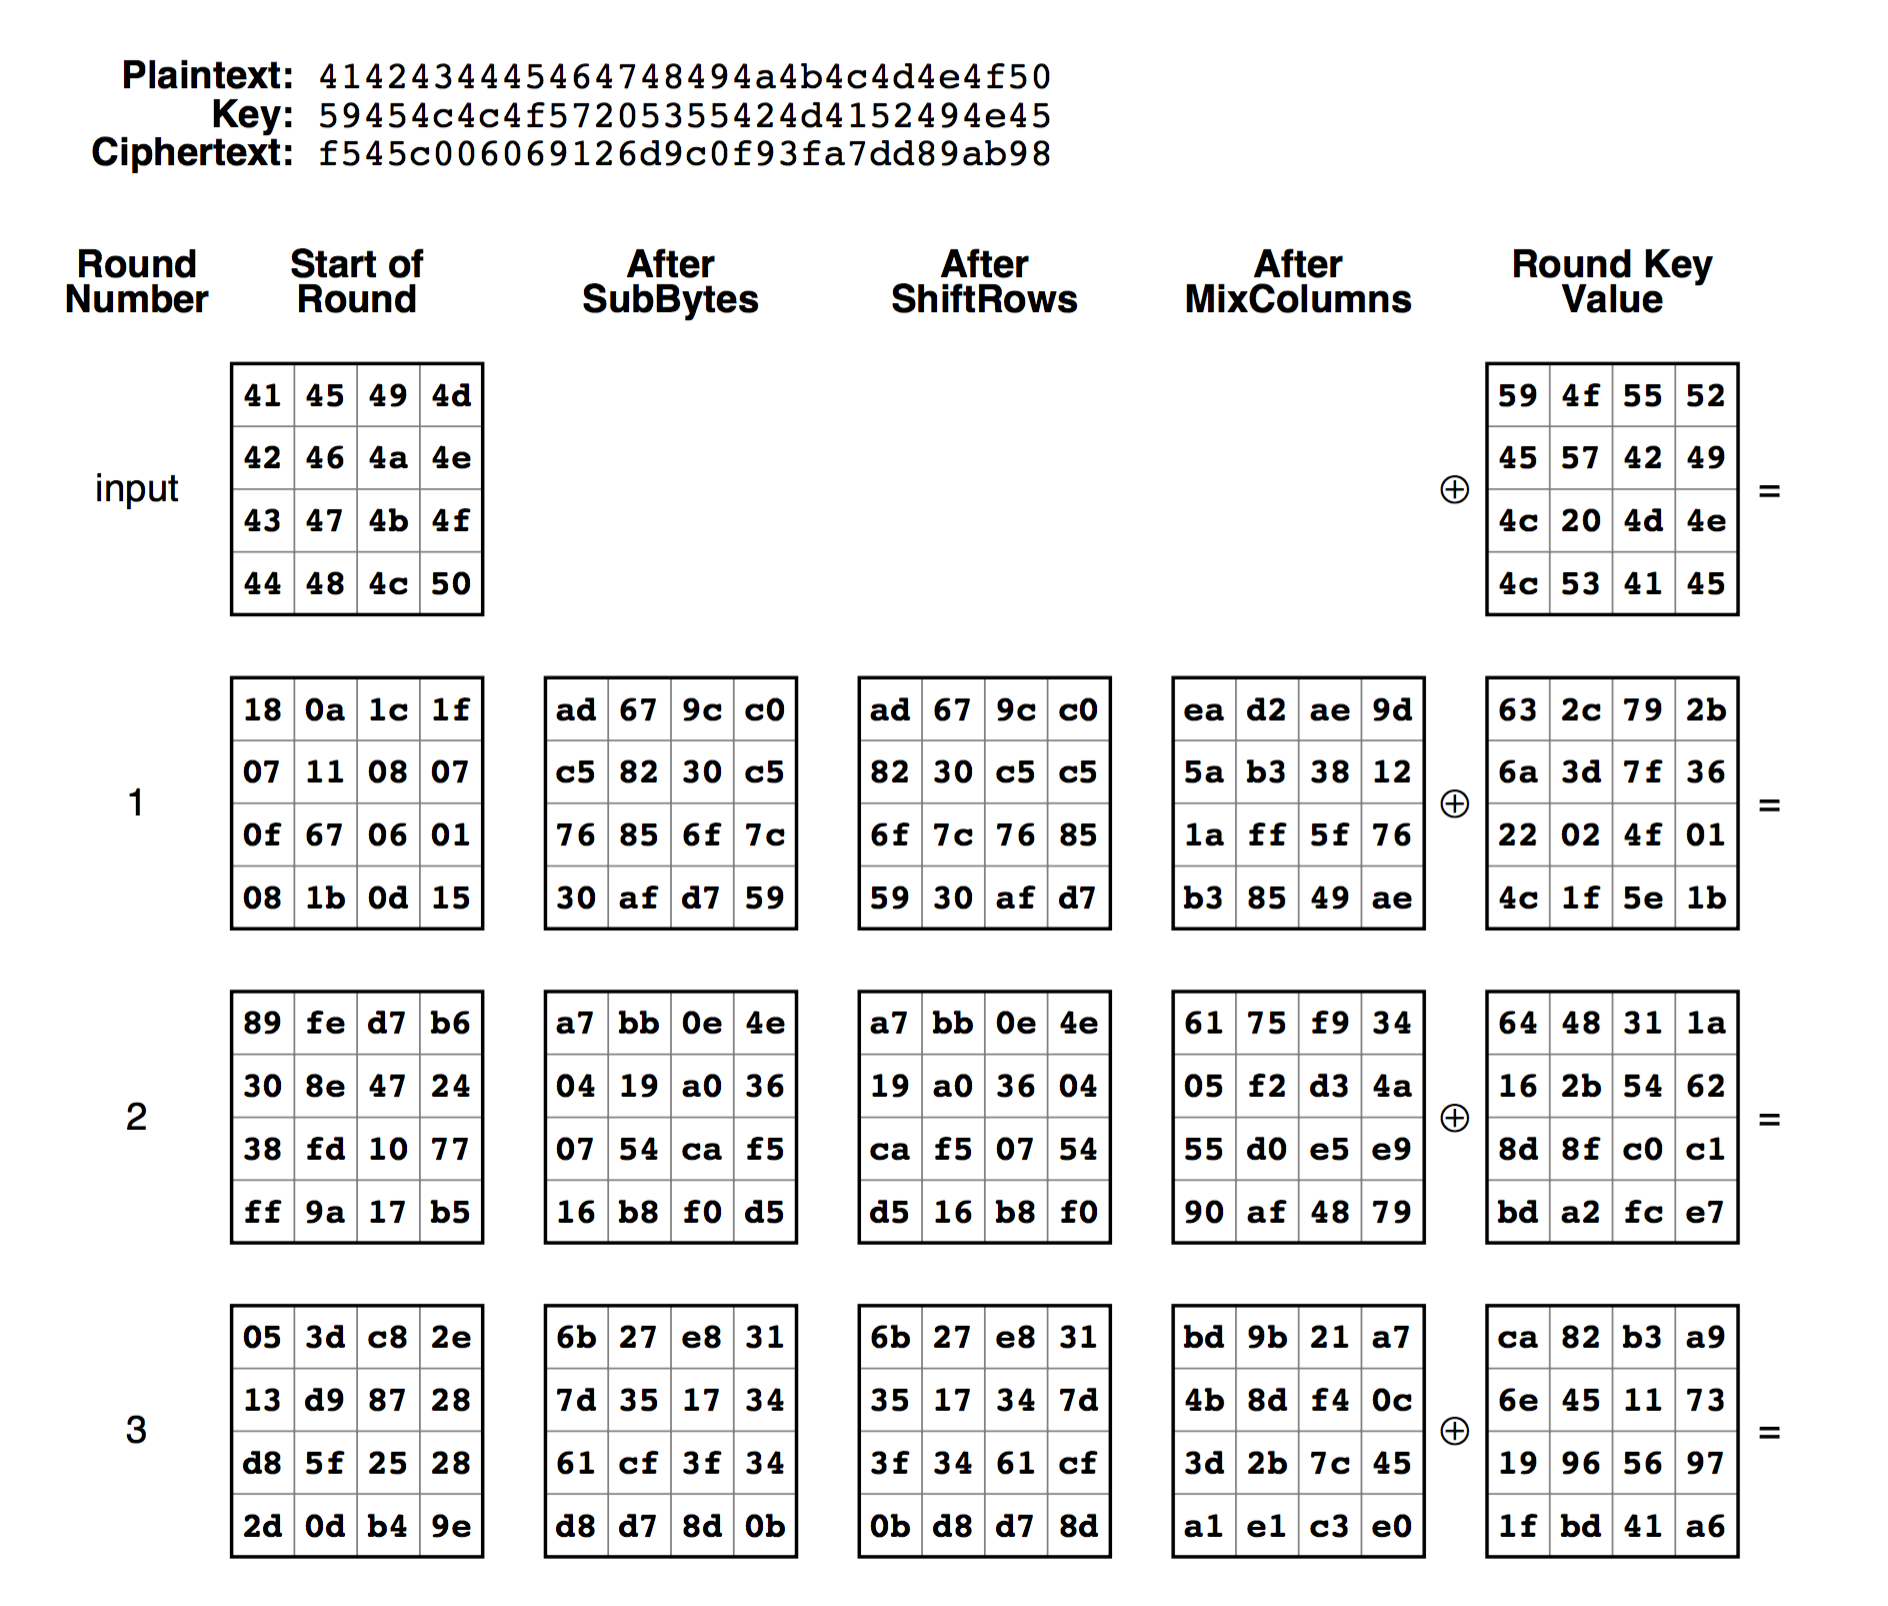
A fruitless attempt I made was to walk through each step of each round of the crypto, trying to identify if I could figure out specific bytes of the key by which bytes changed in the data. This did not get me too much farther along in figuring out the key, but it did really help me get a good understanding of how AES works. One indispensible tool in this was this postscript script that shows the result of every single step in every round, from plain text and key down to the final ciphertext.
At some point it dawned on me that “whitebox”, the challenge name, might mean something, and that’s when I dove into the papers. The most useful papers I found on, appropriately, whiteboxcrypto.com. I read a handful of good papers, including a phrack article, but it was the paper by some guys from NXP and Quarks Lab that really unlocked it for me.
How did it unlock it for me? While it was a well written article and I got the idea, I’m still dumb and didn’t know how to determine at which points to take measurements, or just in general how to use any measures I could make. Luckily they provide a tool that utilizes Valgrind or Intel PIN to instrument a binary and traces memory reads, writes, and executions, along with a tool that nicely visualizes it. I set it up (choosing Valgrind to instrument) and, once I constrained understand what the memory region constraints meant (they constrain the code segments that are active for, not which memory regions they trace), I was able to see some cool visualizations of what was happening. Below, for example, you can clearly see the ten rounds of shiftrows.
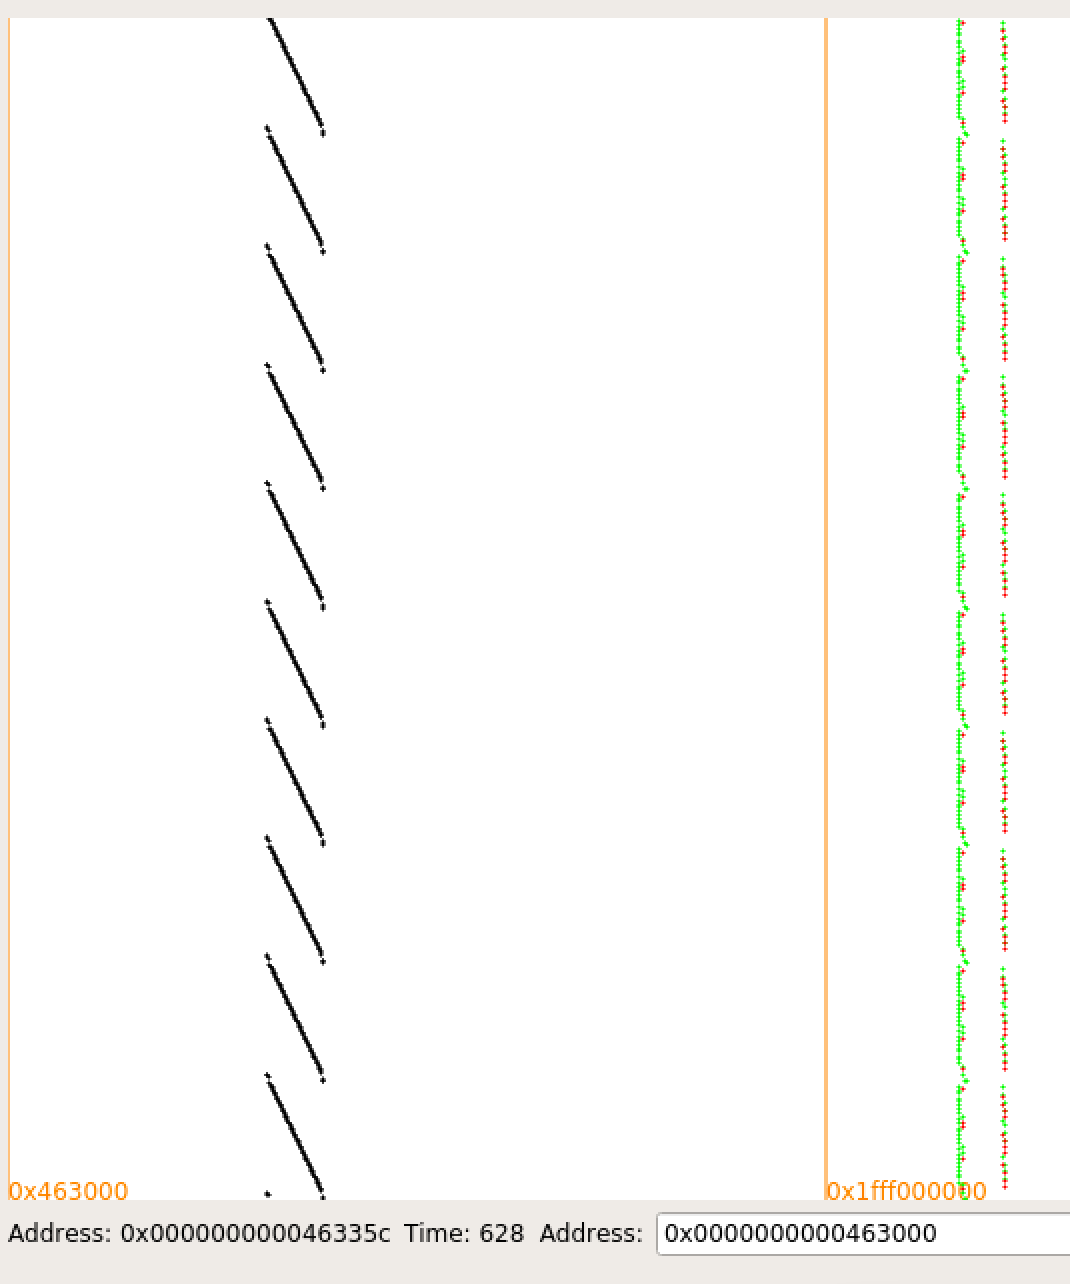
This was cool, but it didn’t solve anything for me, I still had a bunch of data I didn’t know how to translate to a key.
A bit more playing around and reading led me to another one of their projects called Daredevil, which is some kind of magic. There is another project, Deadpool with a bunch of examples of its use plus a bunch of helper scripts.
I went through the examples until I found one that seemed suitably similar and basically just had to rewrite two functions, to ‘shape’ the input and output into a form it can handle and gave it a run:
➜  DCA git:(master) ✗ python trace_it.py
00000 F746E994FE04B79D7002734057868641 -> 8A9AB1CEFD6AAEAAA0BAF5CB34E5DCB8
00001 9770F3A54E25A2D63A1B32366F74875E -> 4C92744102E322A45F4A1E6460FC57BD
00002 C4B3A5FE48BA8D49712A8EF3C5F5DF06 -> CB7CCD1DD1497EA4120D27FDA868F566
00003 9BD0520D814F780534D06F806BA09776 -> E3677ADADCE9599CA6D4895924CF96F1
00004 4CD98EFA2CD34C81DA91BB67CDBFE0C2 -> 0DA2C69CBED6C6FA5D28740552817442
...
➜  DCA git:(master) ✗ daredevil -c mem_addr1_rw1_64_48696.attack_sbox.config

[CONFIGURATION]
...
[/CONFIGURATION]

[INFO] File LUT/AES_AFTER_SBOX not found, using /usr/local/share/daredevil/LUT/AES_AFTER_SBOX instead.
[INFO] Lookup table specified at LUT/AES_AFTER_SBOX

[ATTACK] Computing 1-order correlations...
[ATTACK] Key byte number 0

[ATTACK] Target bit number 0

...

Most probable key max(abs):
1: 16: 61316c5f7434623133355f525f6f5235
2: 15.6891: 61076c5f7434623133355f525f6f5235
3: 15.6888: 6131385f7434623133355f525f6f5235
4: 15.6875: 61316c0d7434623133355f525f6f5235
5: 15.6872: 61316c5f7434953133355f525f6f5235
6: 15.378: 6107385f7434623133355f525f6f5235
7: 15.3766: 61076c0d7434623133355f525f6f5235
8: 15.3763: 6131380d7434623133355f525f6f5235
9: 15.3763: 61076c5f7434953133355f525f6f5235
10: 15.376: 6131385f7434953133355f525f6f5235
[INFO] Total attack of file LUT/AES_AFTER_SBOX done in 134.893164 seconds.

➜  DCA git:(master) ✗ python -c "print '61316c5f7434623133355f525f6f5235'.decode('hex')"
a1l_t4b135_R_oR5
Below is my script
#!/usr/bin/env python

import sys
sys.path.insert(0, '../../')
from deadpool_dca import *

def processinput(iblock, blocksize):
    try:
        return (hex(iblock)[2:-1].rjust(32, "0").decode('hex'), ["--stdin"])
    except:
        import pdb; pdb.set_trace()
        return None

def processoutput(output, blocksize):
    output = output.replace(" ", "").rstrip()
    return int(output, 16)

T=TracerGrind('../target/wb_challenge', processinput, processoutput, ARCH.amd64, 16)
T.run(64) # Number of runs. Raise if it doesn't work
bin2daredevil(configs={'attack_sbox':   {'algorithm':'AES', 'position':'LUT/AES_AFTER_SBOX'},
                       'attack_multinv':{'algorithm':'AES', 'position':'LUT/AES_AFTER_MULTINV'}})
Note how in the end I needed to know almost NOTHING about the binary, only how it expects input (and it provided a --stdin option, which was convenient), prints its output, and that it implements AES-128. All props go to the guys who made these tools.
Last modified on 2017-09-03